Page 18 of 27
Re:
Posted: Sun Jun 06, 2010 5:07 am
by Joe
Master Yota wrote:Josh wrote:
650 dosen't seem too painful when you consider any stock type rad (for any application) is usually 400 or more. Thats a nice piece. I might need to look into that if the one I'm using dosen't cut the mustard in the cooling dept....
FWIW, I was given a rebuilt stock M37 radiator when I bought mine and I was told it costs just under $600 so I'd say that $650 for your shiny one is a bargain!
Lookin' good Josh!
Re: Rebuild progress, Thread #2 (3/2/10) PG 7
Posted: Sun Jun 06, 2010 9:06 pm
by Josh
well, other than hoses, the steering system is DONE!
Finished the column tonight. got the joints welded to the shaft, and the shaft support plate welded to the column. the onyl bad thing about the way I set it up, is that with the plate on the shaft where it bolts to the firewall, it prevents you from being able to slip the U joint end on the steering box end, meaning you either have to move the cab, or take the box off its mounts. There is a little centering pin sticking out of the end of the steering box for when it had the original W200 rag joint on it, I might ty cutting that pin off and seeing if that will give me the clearance I need to be able to take the column in and out without removing the steering box. If not, it's not a big deal, as how often does the steering column need to come out for serivce anyway?
I took a few pictures, but, a video better shows the system in action, and it also shows how little slop is in the system. The best part is that it is less than 2 1/4 turns lock to lock!!!

Ignore all the noises in the video, the front left tire was banging into a piece of sheetmetal I have leaning against the garage wall. It is a compilation of clips, the first is showing number of turns, lock to lock (count 'em, less than 2 1/4!!!), second is showing the joints and column (was turning it with one hand, and holding the camera with the other, hence the slow pace), and the third is showing how little slop is in the system. The back and forth motion is to tighten it up all the way down to the steering knuckle arm... so that include the spring movement in all 4 socket joints!


Re: Rebuild progress, Thread #2 (3/2/10) PG 7
Posted: Sun Jun 06, 2010 11:12 pm
by Master Yota
Are you concerned at all that the box ratio might be too fast? I've found that 3.5-4 turns lock to lock is good for a truck with big tires, anything faster seems to get a little twitch on the highway... Plus the added strain on the steering box (namely from the larger tires - scrub radius, lower pressure, wheel offset...etc) is huge. I hope it works well for you, but do you have a backup plan if you don't like the road feel?
Re: Rebuild progress, Thread #2 (3/2/10) PG 7
Posted: Mon Jun 07, 2010 4:39 am
by W_A_Watson_II
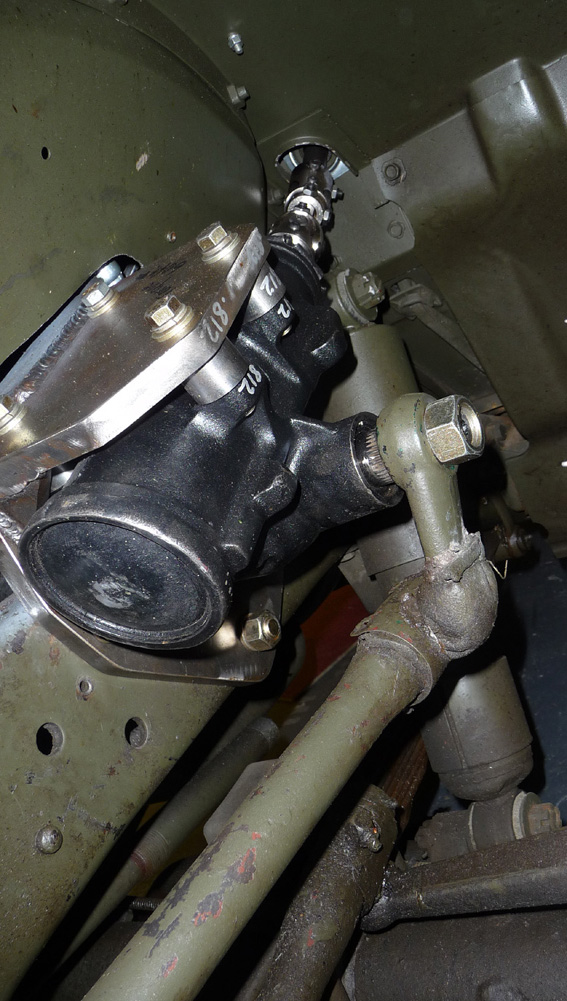
Watch the clearance between the 1st drag link and the front left corner of the steering box. Your box is mounted at an even grater than mine, and I've had a little problem. Mine first had a problem when the front left bolt broke and fell down and hit the arm, causing stress on the pitman arm. This photo was after I replaced the bolt and cleaned up the drag link gouges, and since I left the lock washer out on bottom for more clearance I installed a lock nut on top.

Then I had the spring pack bolt brake and the axle slide forward, and it took an over steer to the left to keep the wheels straight which caused the drag link to hit again and eventually cause the pitman arm to break.


Re: Rebuild progress, Thread #2 (3/2/10) PG 7
Posted: Mon Jun 07, 2010 5:12 am
by Josh
Will, yes, I have that interference issue... Didn't notice it until last night, otherwise I would have mounted the box angle lower. I was attempting to minimize steering shaft angles with the steep box angle. I'm going to trim the box bracket, and leave that 4th bolt out, or thread it in from above so that it is a stud that sticks through flush with the bottom of the bracket. The hydro ram on the tie rod will be doing 75% of the work, so I think it will be ok with only 3 bolts. I'm going to adjust the left knuckle stop (another of the many advantages of Danas) so that when I turn to the right the knuckle stops the steering system before the pitman arm introduces itself to the box bracket. Worse comes to worst, I can always put a longer pitman on it, but that will tighten up the ratio even more.
I think it will be alright with that low a ratio, as I said, the hydro ram will be doing most of the work, so it should be relatively tame.
Re: Rebuild progress, Thread #2 (3/2/10) PG 7
Posted: Mon Jun 07, 2010 8:26 am
by M37UK
I have a slightly different setup to you guys and I dont get the interference issue.
- Power steering.jpg (218.05 KiB) Viewed 2126 times
Stu

Re: Rebuild progress, Thread #2 (3/2/10) PG 7
Posted: Mon Jun 07, 2010 10:05 am
by Josh
NICE! never thought to mount the box upside down... D'oH!

If the 2.1:1 ratio ends up being to aggressive, I can add a longer radius arm to the steering knuckle, so that teh steering system has to travel further for the same knuckle movement.
Re: Rebuild progress, Thread #2 (3/2/10) PG 7
Posted: Mon Jun 07, 2010 10:17 am
by M37UK
Josh wrote:NICE! never thought to mount the box upside down... D'oH!
If the 2.1:1 ratio ends up being to aggressive, I can add a longer radius arm to the steering knuckle, so that teh steering system has to travel further for the same knuckle movement.
I have Charles to thank for this setup.
Stu
Re: Rebuild progress, Thread #2 (3/2/10) PG 7
Posted: Tue Jun 08, 2010 10:24 am
by Juan
If you follow Tom's (snake River 4x4) instructions to mount the steering gear, you are not going to have the interference issue.
There's a picture in his website that makes cristal clear where to drill the holes for the steering gear mount.
Re: Rebuild progress, Thread #2 (3/2/10) PG 7
Posted: Tue Jun 08, 2010 11:55 am
by W_A_Watson_II
I followed Tom's procedure and still wish I'd mounted it higher and flater. It's a good design, just a tight installation that expects everything to stay tight and in place.
Re: Rebuild progress, Thread #2 (3/2/10) PG 7
Posted: Tue Jun 08, 2010 3:35 pm
by Master Yota
You do realize Josh that since you've modded the coloum as you have, it would be a very minimal affair to put a crossover steering box on the frame and purchase one steering arm for the right knuckle on your 60. Fab a drag link and bingo, your done. No more issues with clearance....
Re: Rebuild progress, Thread #2 (3/2/10) PG 7
Posted: Wed Jun 09, 2010 1:30 pm
by Josh
call me quirky, but, there is something about all that linkage moving that is somewhat "magical" to me, and I like it, so, it's staying...
It's like the original pedals, several guys dont liek them because the go through the floor and make refitting stuff more dificult, but I love the look and feel, so I kept them.
Re: Rebuild progress, Thread #2 (3/2/10) PG 7
Posted: Wed Jun 09, 2010 5:12 pm
by Josh
bit more work done. I made a schedule in true engineering fashion to track my progress and keep myself on track. Tenative final assembly date is second week of August. So far, I'm on track 2 weeks into the schedule I put together.
I started working on the cab tub today, banged some of the larger dents out, straightened the drip rail above the engine on the firewall, as well as straightening the box edges that the seats sit on. There are a few recessed dents left that are located on the corners where the floor is... I can't get my hammer in there to bang them back out. Was thinking of filling them with lead free metal body filler, but, does anyone else have any suggestions?
I also welded up about 80% of the holes in the firewall, as I will no longer need them, and when I had the V8 in it before, they were just a source for dirt, noise and temperature to come through. I need to grind the welds, but they are all tacked in for now. I plan on passing the wiring through the firewall in two bundles, an engine mangement bundle, and a chassis bundle. I'll use two of these to do it:
http://www.diyautotune.com/catalog/weat ... p-364.html
Then I can easily unplug the engine if it needs to come out, or the front chassis, if the front sheet metal needs to come off


Re: Rebuild progress, Thread #2 (3/2/10) PG 7
Posted: Thu Jun 10, 2010 8:04 pm
by Josh
Got some more work done tonight... got the firewall ground out, just need a smidge of filler here and there. Also got the T case shift linkage mostly done. I need a second stock M37 lever, and a doghouse draft pad to go around them. I plan on mounting them side by side, instead of front to back like in the stock M. Reason being is then I can independently control the low range and the full time 4X4 lock. Also got the coilpacks mounted. Passenger's side was easy, drivers side sucked. Starter made it much harder to mount the drivers side. Also got the PS pump painted, as well as the blower drive. I need to take teh manifolds back off because I forgot to put pressure port taps in them ($^@&!^@!@ @#!@&#$! #$&$!#&!@$) but, oh well. Once those are off, I'm going to give them and the blowers a fresh coat of paint, as they have gotten pretty nicked up from all the test fitting, then they, the blower drive, the alternator, the power steering pump, and the cog belt can go on once and for all. Then, I can move on to the coolant system. I plan on making stainless steel hard lines, with just little rubber connectors on each end. This is for two reasons: 1) they look nice; and 2) the upper needs to be stiff as it passes over the jackshaft bearing so it will need to be self supporting.


Passenger's side:


Driver's side:


Re: Rebuild progress, Thread #2 (3/2/10) PG 7
Posted: Sun Jun 27, 2010 11:01 pm
by Josh
Beeen a while since my last update. Still on track for finishing middle of August, but, I had to make some concessions to meet the timeline. I pulled the blowers back off, for now. I'll add them back in later, but, for now, I had to take tehm out to cut some cost out. Wasn't too bad, I simply swapped the fuel injectors over into the factory cast iron manifold after I drileld it for the injector bungs:


The next problem then was figuring out how to get air into teh beast, and, to same some more cash, I kept the ford 65mm TB's. the two TBs have the same area as the 4 holes in the factory intake manifold, so, a little bit of fab, and I was all set:


Doesn't look quite as cool as two big blowers, but, not bad!
Got the exhaust finished as well. Passenger's side wasn't too bad, but, the driver's side SUCKED!
Passenger's:


Driver's side. Driver's side cleared SEVERAL things by less than an inch: firewall, wastegate head, steering shaft, shock mount, brake pedal, clutch pedal, fender support. I ended up having to cut it apare and takc it back up 4 times before I was happy with the result. It's a good thing I have limiters on the motor mounts, as if they moved any further, it would surely hit somewhere:


And, finally, finished the charge pipe between the turbos and the dual inlets:


Dump valve: releases the turbo pressure when the throttles close under load so that it doesn't back up into the turbo and damage the compressor or shaft:

